Schedule a build
You can use the CI/CD Manager API to create schedules for InsuranceSuite applications, Digital applications, and Guidewire Testing Framework (GT: Framework).
All sample requests in this guide include the following path parameters:
| Parameter name | Description |
|---|---|
tenantId | Tenant ID. |
starSystemId | ID of the star system that includes the application for which you create a schedule. |
applicationId | Application for which you create a schedule: - PC for PolicyCenter - BC for BillingCenter - CC for ClaimCenter - CM for ContactManager - PORTALS for Digital applications - GT_FRAMEWORK for Guidewire Testing Framework |
buildScheduleId | Schedule ID. |
In the request URLs, substitute {baseUrl} with the correct URL for your region. For details, see Base URLs.
About schedules
By creating a schedule, you can configure one or more TeamCity builds to run automatically at a specific time. You can create multiple schedules for each application.
You can create up to 20 schedules. This number includes both active and inactive schedules across all your projects.
Schedule definition
{
  "name": "Daily PC build",
  "enabled": false,
  "id": "afcd3b9e11774f56a61ffee1763ebce7",
  "branchFilter": "+:<default>",
  "withPendingChangesOnly": false,
  "cron": {
    "seconds": "0",
    "minutes": "0",
    "hours": "12",
    "dayOfMonth": "*",
    "dayOfWeek": "?",
    "month": "*",
    "year": "*",
    "timezone": "US/Pacific"
  },
  "builds": [
    {
      "buildType": "DOCKERIZE_IS",
      "predefinedParameters": {}
    }
  ]
}
Parameters
| Name | Type | Description |
|---|---|---|
name | string | Schedule name. |
enabled | Boolean | Indicates whether the schedule is active. |
id | string | Schedule ID. |
branchFilter | string | Defines branches on which the scheduled builds will run. |
withPendingChangesOnly | Boolean | Indicates whether to trigger builds only on branches with pending changes. |
cron | object | Specifies when to run a schedule. |
builds | array | Specifies TeamCity builds included in the schedule and, optionally, their configuration. |
Name and ID
When creating a schedule, you must define its name. Schedule name must be unique at application level and no longer than 255 characters.
Schedule ID is generated automatically. If you pass the id parameter in a request body, its value is ignored.
Branch filter
Use the branchFilter parameter to specify branches on which the scheduled builds will run:
- To include a branch, use
+:branch_name. - To exclude a branch, use
-:branch_name. - To separate rules, use a newline character:
\n. - You can use a wildcard
*. - Branch names are case-sensitive.
For example:
- Include all branches:
"branchFilter": "+:*"
- Include only a default branch:
"branchFilter": "+:<default>"
- Include all branches except for the the default one:
"branchFilter": "+:*\n-:<default>"
- Include all branches prefixed with
feature-:
"branchFilter": "+:feature-*"
Cron expression
To specify when and how often to run a schedule, use the cron parameter.
cron is an object representation of the Quartz cron expression with one additional field: timezone:
| Field | Possible values | Special characters | Default value |
|---|---|---|---|
seconds | 0–59 | , - * / | 0 |
minutes | 0–59 | , - * / | 0 |
hours | 0–23 | , - * / | * |
dayOfMonth | 1–31 | , - * / ? L W | * |
month | 1–12 or JAN–DEC | , - * / | * |
dayOfWeek | 1–7 or SUN-SAT | , - * / ? L # | ? |
year | 1970-2099 or null | , - * / | * |
timezone | Time zone name according to the time zone database | GMT |
For dayOfWeek, 1 represents Sunday, 2 represents Monday, etc.
For example, you can set your schedule to run:
- Every day at 12:00 p.m. GMT
{
  "dayOfMonth": "*",
  "dayOfWeek": "?",
  "hours": "12",
  "minutes": "0",
  "month": "*",
  "seconds": "0",
  "timezone": "GMT",
  "year": "*"
}
- Every Monday, Tuesday, Wednesday, Thursday, and Friday at 10:15 a.m. GMT
{
  "dayOfMonth": "?",
  "dayOfWeek": "MON-FRI",
  "hours": "10",
  "minutes": "15",
  "month": "*",
  "seconds": "0",
  "timezone": "GMT",
  "year": "*"
}
- On the third Friday of every month at 10:15 a.m. PST
{
  "dayOfMonth": "?",
  "dayOfWeek": "6#3",
  "hours": "10",
  "minutes": "15",
  "month": "*",
  "seconds": "0",
  "timezone": "US/Pacific",
  "year": "*"
}
- Every 5 minutes between 2:00 p.m. and 2:55 p.m. GMT, then every 5 minutes between 6:00 p.m. and 6:55 p.m. GMT every day
{
  "dayOfMonth": "*",
  "dayOfWeek": "?",
  "hours": "14,18",
  "minutes": "0/5",
  "month": "*",
  "seconds": "0",
  "timezone": "GMT",
  "year": "*"
}
- In 2024, every day at 10:15 a.m. PST
{
  "dayOfMonth": "*",
  "dayOfWeek": "?",
  "hours": "10",
  "minutes": "15",
  "month": "*",
  "seconds": "0",
  "timezone": "US/Pacific",
  "year": "2024"
}
Builds
A schedule can consist of multiple builds as long as they apply to the same application. To specify the TeamCity builds included in the schedule, use the builds property.
The builds property is an array of objects that represent TeamCity builds and their configuration. Each object includes the following properties:
| Property | Description |
|---|---|
buildType | A TeamCity build. |
predefinedParameters | A custom configuration of a build: - The structure of this property depends on the build type. - When optional and not specified, a default build configuration is used. |
For example, a schedule that includes smoke tests with default configuration and server tests with custom configuration, might look like this:
"builds": [
  {
    "buildType": "SMOKE_TEST",
    "predefinedParameters": {}
  }
  {
    "buildType": "SERVER_TEST",
    "predefinedParameters": {
      "testSuites": "gw.suites.ExampleSuite, gw.suites.AnotherSuite"
    }
  }
]
Create a schedule
To schedule builds for an application, send the following POST request:
curl -X 'POST' \
  '{baseUrl}/api/v2/tenants/{tenantId}/starsystems/{starSystemId}/cicd-configs/{applicationId}/build-schedules' \
  -H 'Accept: */*' \
  -H 'Authorization: Bearer {access_token}' \
  -H 'Content-Type: application/json' \
  -d '{body}'
Where {body} contains a schedule definition.
For example, to schedule a Dockerize Application build with default configuration to run on the default branch every day at noon CET, use the following request body:
{
  "name": "Daily Dockerize Build",
  "enabled": true,
  "branchFilter": "+:<default>",
  "withPendingChangesOnly": false,
  "cron": {
    "seconds": "0",
    "minutes": "0",
    "hours": "12",
    "dayOfMonth": "*",
    "dayOfWeek": "?",
    "month": "*",
    "year": "*",
    "timezone": "CET"
  },
  "builds": [
    {
      "buildType": "DOCKERIZE_IS",
      "predefinedParameters": {}
    }
  ]
}
Response contains your new schedule configuration:
{
  "name": "Daily Dockerize Build",
  "enabled": true,
  "id": "afcd3b9e11774f56a61ffee1763ebce7",
  "branchFilter": "+:<default>",
  "withPendingChangesOnly": false,
  "cron": {
    "seconds": "0",
    "minutes": "0",
    "hours": "12",
    "dayOfMonth": "*",
    "dayOfWeek": "?",
    "month": "*",
    "year": "*",
    "timezone": "CET"
  },
  "builds": [
    {
      "buildType": "DOCKERIZE_IS",
      "predefinedParameters": {}
    }
  ]
}
Customize build parameters
By default, scheduled builds use the parameter values configured in a TeamCity project for a selected application. You can customize this configuration with the predefinedParameters properties. For details, see Builds.
Customized parameters apply only to the scheduled builds. Defining the predefinedParameters properties doesn't override the default configuration of your builds.
Verify changes in TeamCity
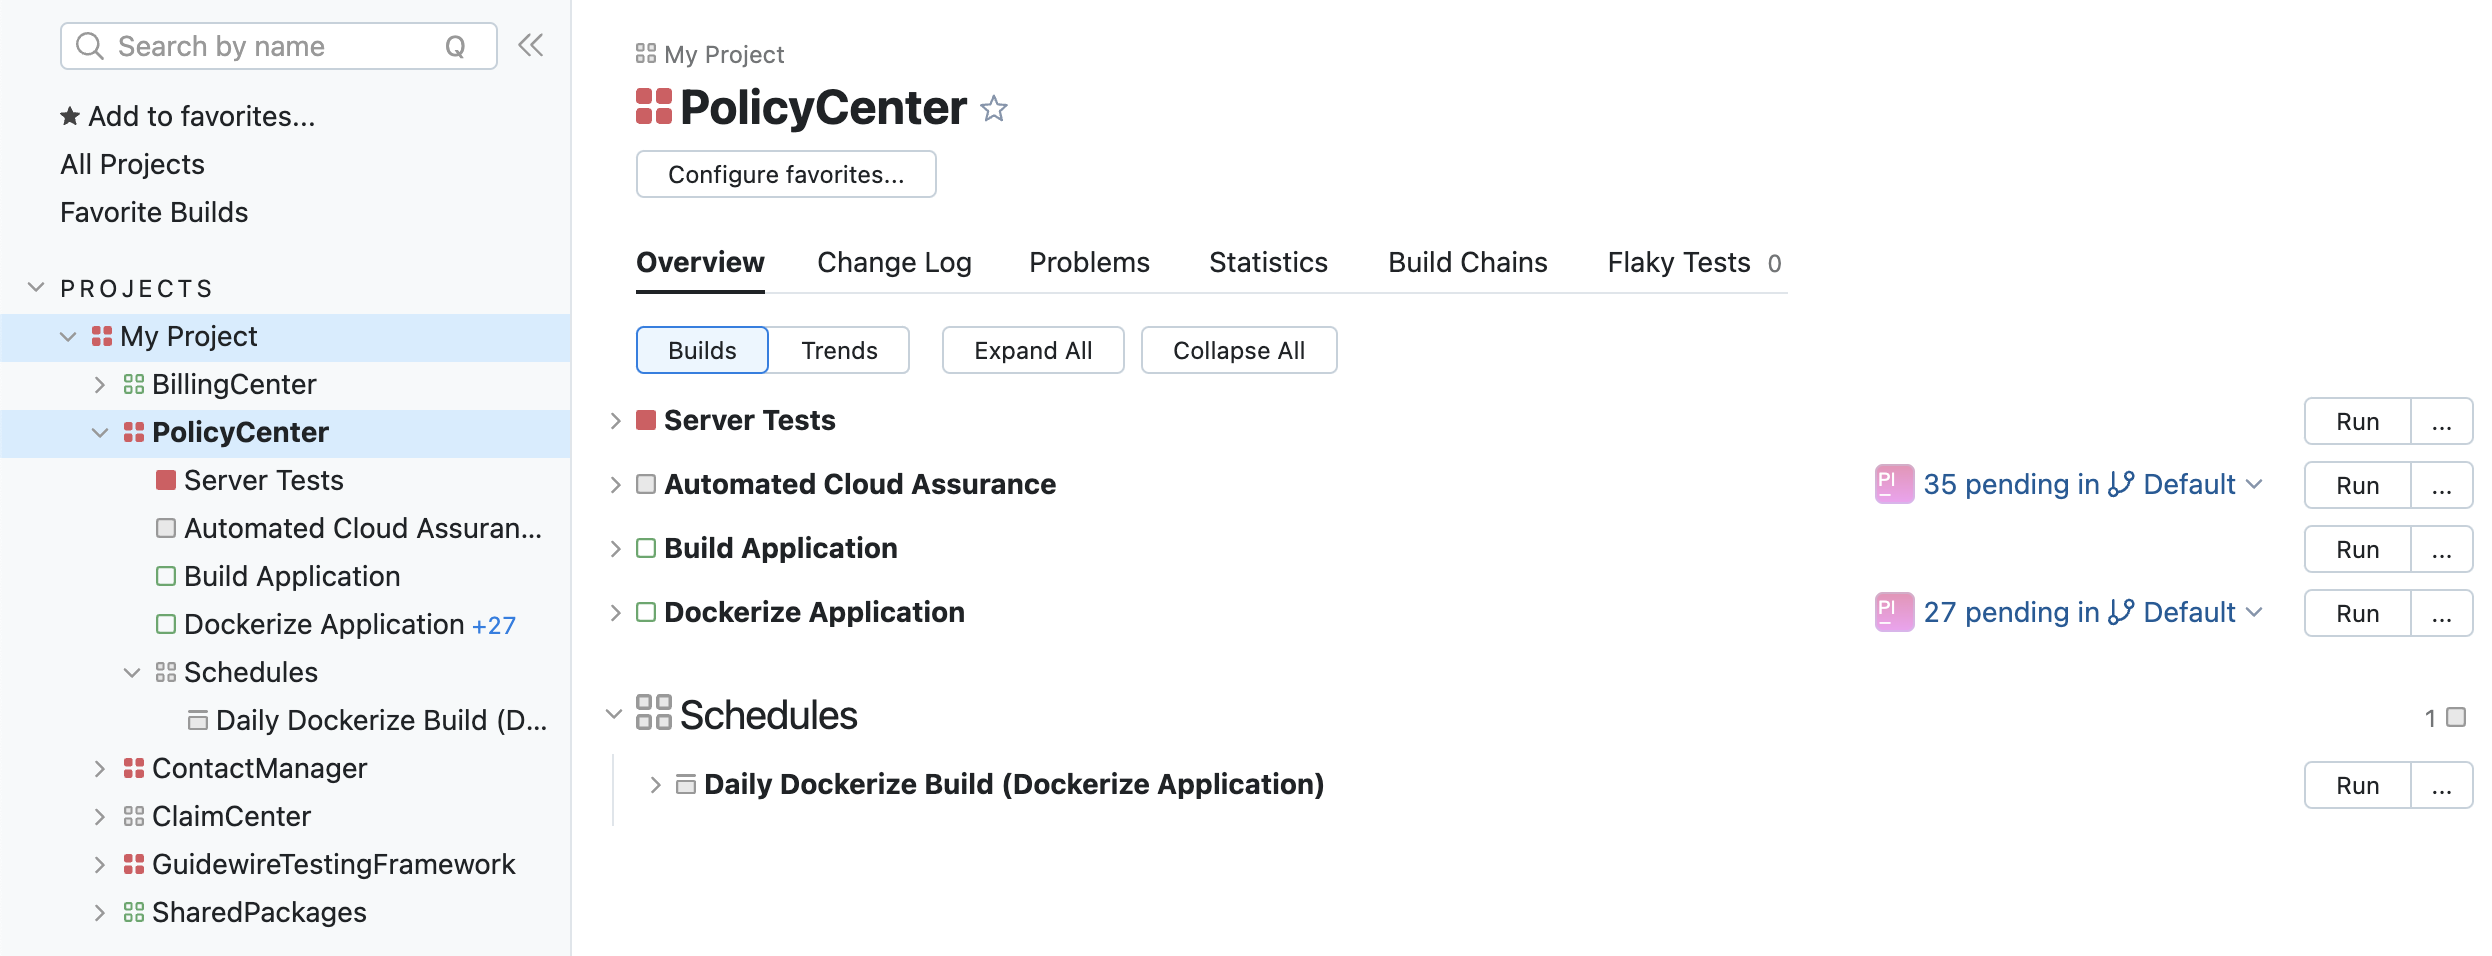
Each schedule appears in a TeamCity project for your application as a separate composite build with the schedule name. Builds included in the schedule are listed in brackets.

To verify a schedule configuration in TeamCity:
- Select an application for which you created a schedule.
- In Schedules, find and select a composite build with your schedule name.
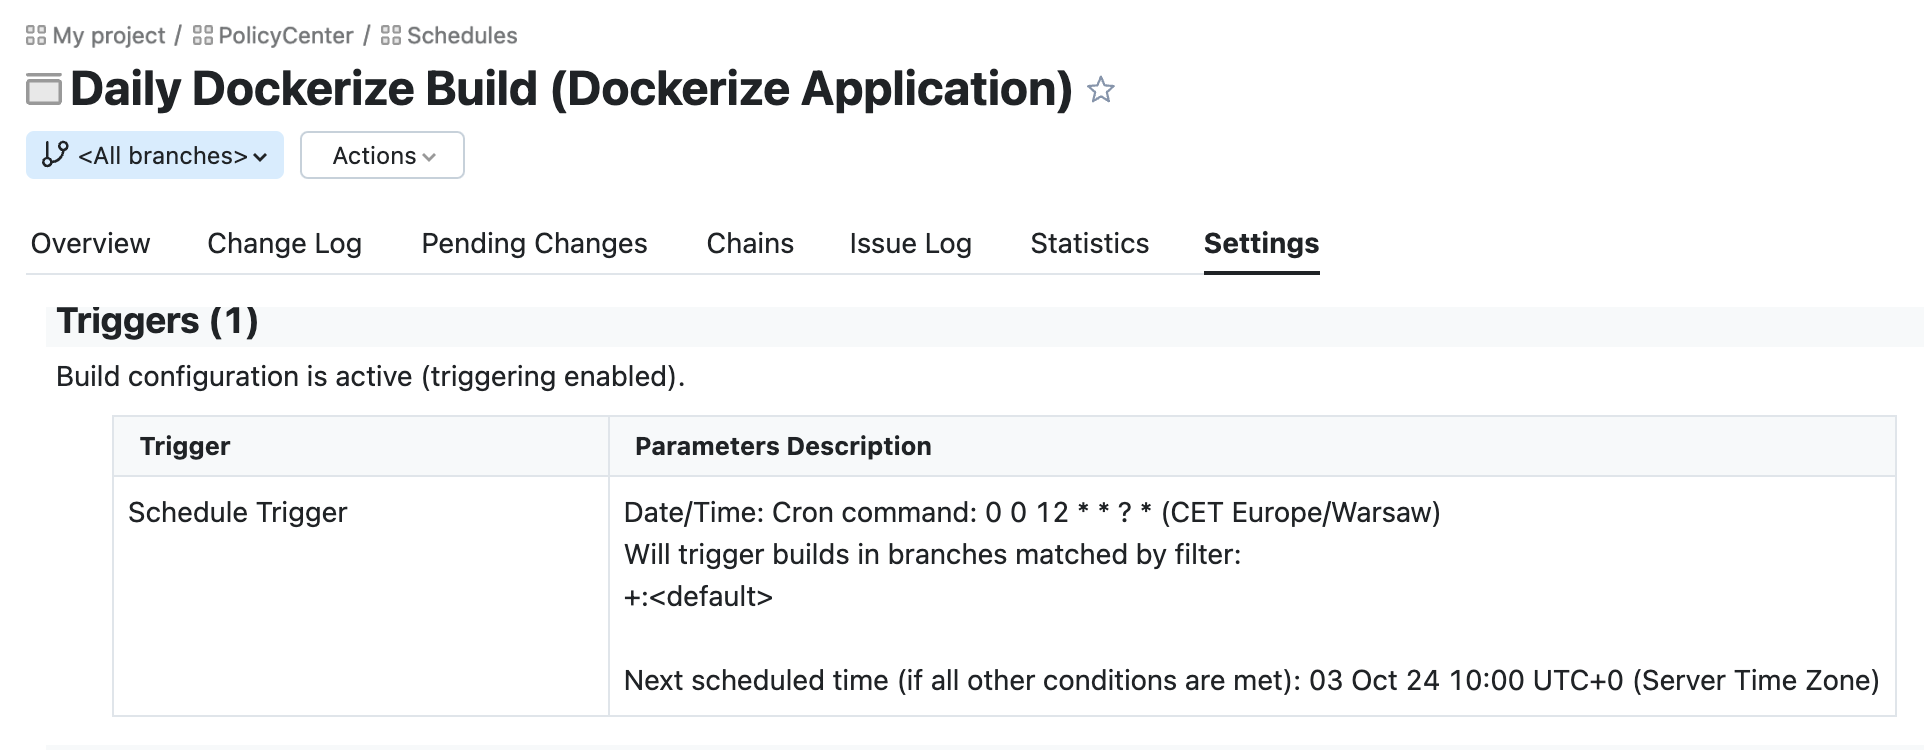
- Go to the Settings tab.
- In the table, check the new Schedule Trigger:

Get created schedule
To retrieve configuration of a specific schedule, send the following GET request:
curl -X 'GET' \
  '{baseUrl}/api/v2/tenants/{tenantId}/starsystems/{starSystemId}/cicd-configs/{applicationId}/build-schedules/{buildScheduleId}' \
  -H 'accept: application/json' \
  -H 'Authorization: Bearer {access_token}'
Response contains a JSON object with the schedule configuration, for example:
{
  "name": "Daily Dockerize Build",
  "enabled": true,
  "id": "afcd3b9e11774f56a61ffee1763ebce7",
  "branchFilter": "+:<default>",
  "withPendingChangesOnly": false,
  "cron": {
    "seconds": "0",
    "minutes": "0",
    "hours": "12",
    "dayOfMonth": "*",
    "dayOfWeek": "?",
    "month": "*",
    "year": "*",
    "timezone": "CET"
  },
  "builds": [
    {
      "buildType": "DOCKERIZE_IS",
      "predefinedParameters": {}
    }
  ]
}
Modify a schedule
You can modify all settings except for an application to which a schedule applies.
Update date and time
To change the date and time details for a schedule, send the following PATCH request:
curl -X 'PATCH' \
  '{baseUrl}/api/v2/tenants/{tenantId}/starsystems/{starSystemId}/cicd-configs/{applicationId}/build-schedules/{buildScheduleId}' \
  -H 'Accept: */*' \
  -H 'Authorization: Bearer {access_token}' \
  -H 'Content-Type: application/json-patch+json' \
  -d '{body}'
Where {body} contains an updated cron object. Follow the JSON Patch format.
For example, to modify a schedule to run every Friday at 3:15 p.m. CET, use the following:
[
  {
    "op": "replace",
    "path": "/cron",
    "value": {
      "seconds": "0",
      "minutes": "15",
      "hours": "15",
      "dayOfMonth": "?",
      "dayOfWeek": "6",
      "month": "*",
      "year": "*",
      "timezone": "CET"
    }
  }
]
For a successful request, you will receive the 200 status code.
To verify these changes in TeamCity:
- Select an application for which you created a schedule.
- In Schedules, find and select a composite build with your schedule name.
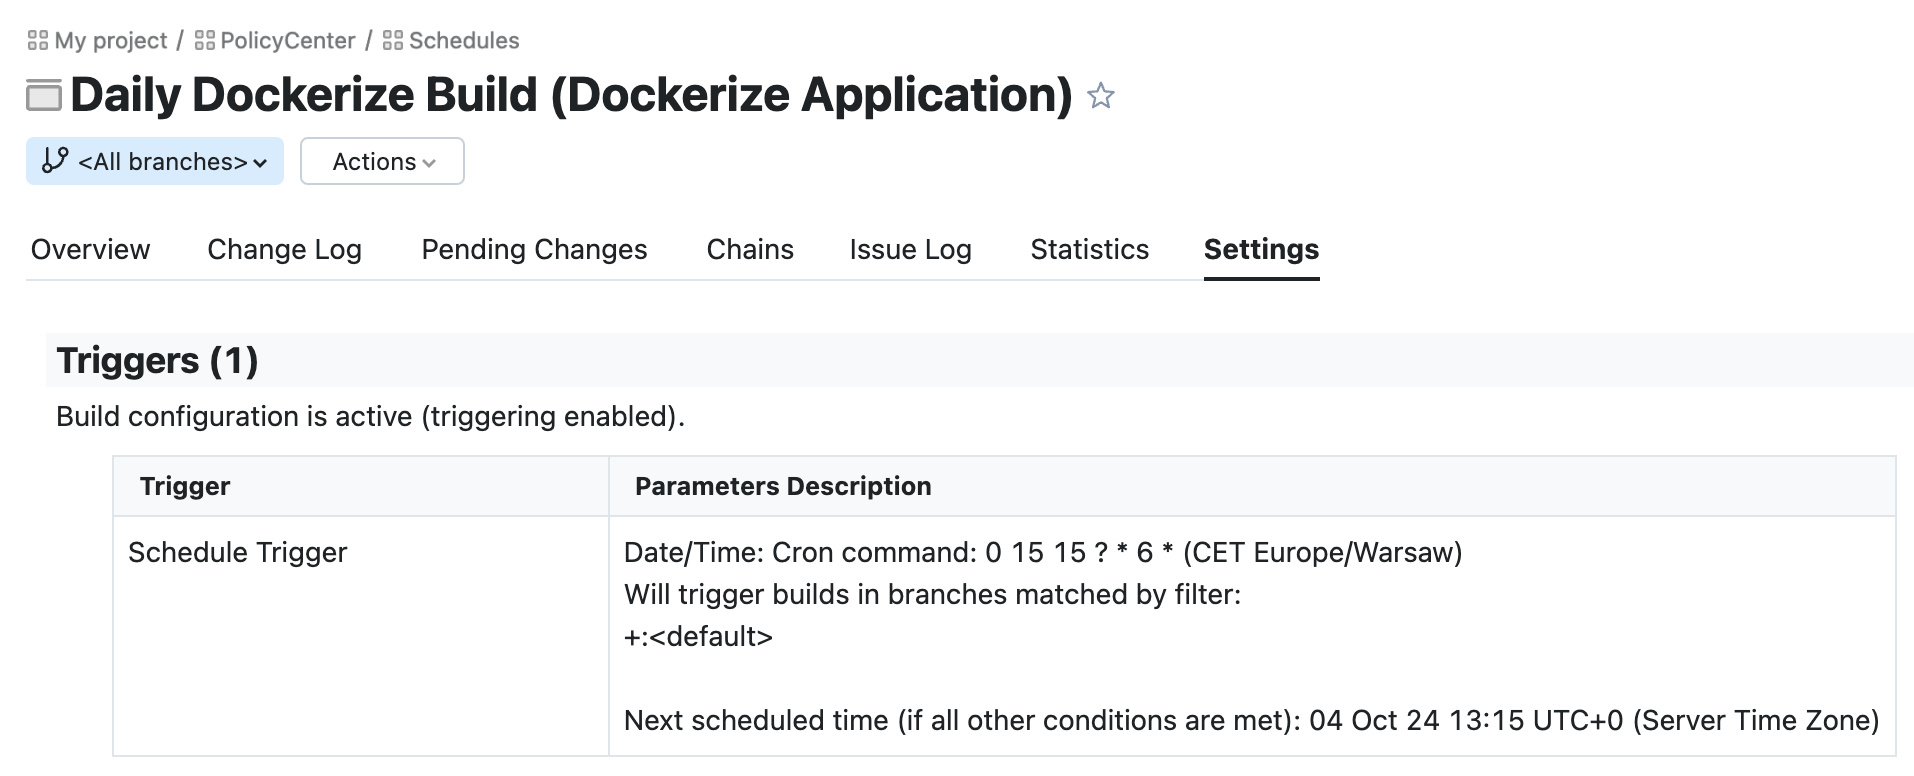
- Go to the Schedules tab.
- In the table, check Parameters Description and the updated cron command for the modified Schedule Trigger:

Make builds run only if there are pending changes
By default, builds run according to the schedule even if there are no changes in your code. To change this behavior and trigger builds only if there are pending changes in your code, send the following PATCH request:
curl -X 'PATCH' \
  '{baseUrl}/api/v2/tenants/{tenantId}/starsystems/{starSystemId}/cicd-configs/{applicationId}/build-schedules/{buildScheduleId}' \
  -H 'Accept: */*' \
  -H 'Authorization: Bearer {access_token}' \
  -H 'Content-Type: application/json-patch+json' \
  -d '{body}'
Where {body} contains an updated schedule configuration. Follow the JSON Patch format:
[
  {
    "op": "replace",
    "path": "/withPendingChangesOnly",
    "value": true
  }
]
For a successful request, you will receive the 200 status code.
To verify these changes in TeamCity:
- Select an application for which you created a schedule.
- In Schedules, find and select a composite build with your schedule name.
- Go to the Schedules tab.
- In the table, check Parameters Description for the modified Schedule Trigger:

Update branch filter
To change the branch on which the scheduled builds run, use the following PATCH request:
curl -X 'PATCH' \
  '{baseUrl}/api/v2/tenants/{tenantId}/starsystems/{starSystemId}/cicd-configs/{applicationId}/build-schedules/{buildScheduleId}' \
  -H 'Accept: */*' \
  -H 'Authorization: Bearer {access_token}' \
  -H 'Content-Type: application/json-patch+json' \
  -d '{body}'
Where {body} contains an updated schedule configuration. Follow the JSON Patch format.
For example, to run scheduled builds on all branches except for the default one, use the following:
[
  {
    "op": "replace",
    "path": "/branchFilter",
    "value": "+:*\n-:<default>"
  }
]
For a successful request, you will receive the 200 status code.
To verify these changes in TeamCity:
- Select an application for which you created a schedule.
- In Schedules, find and select a composite build with your schedule name.
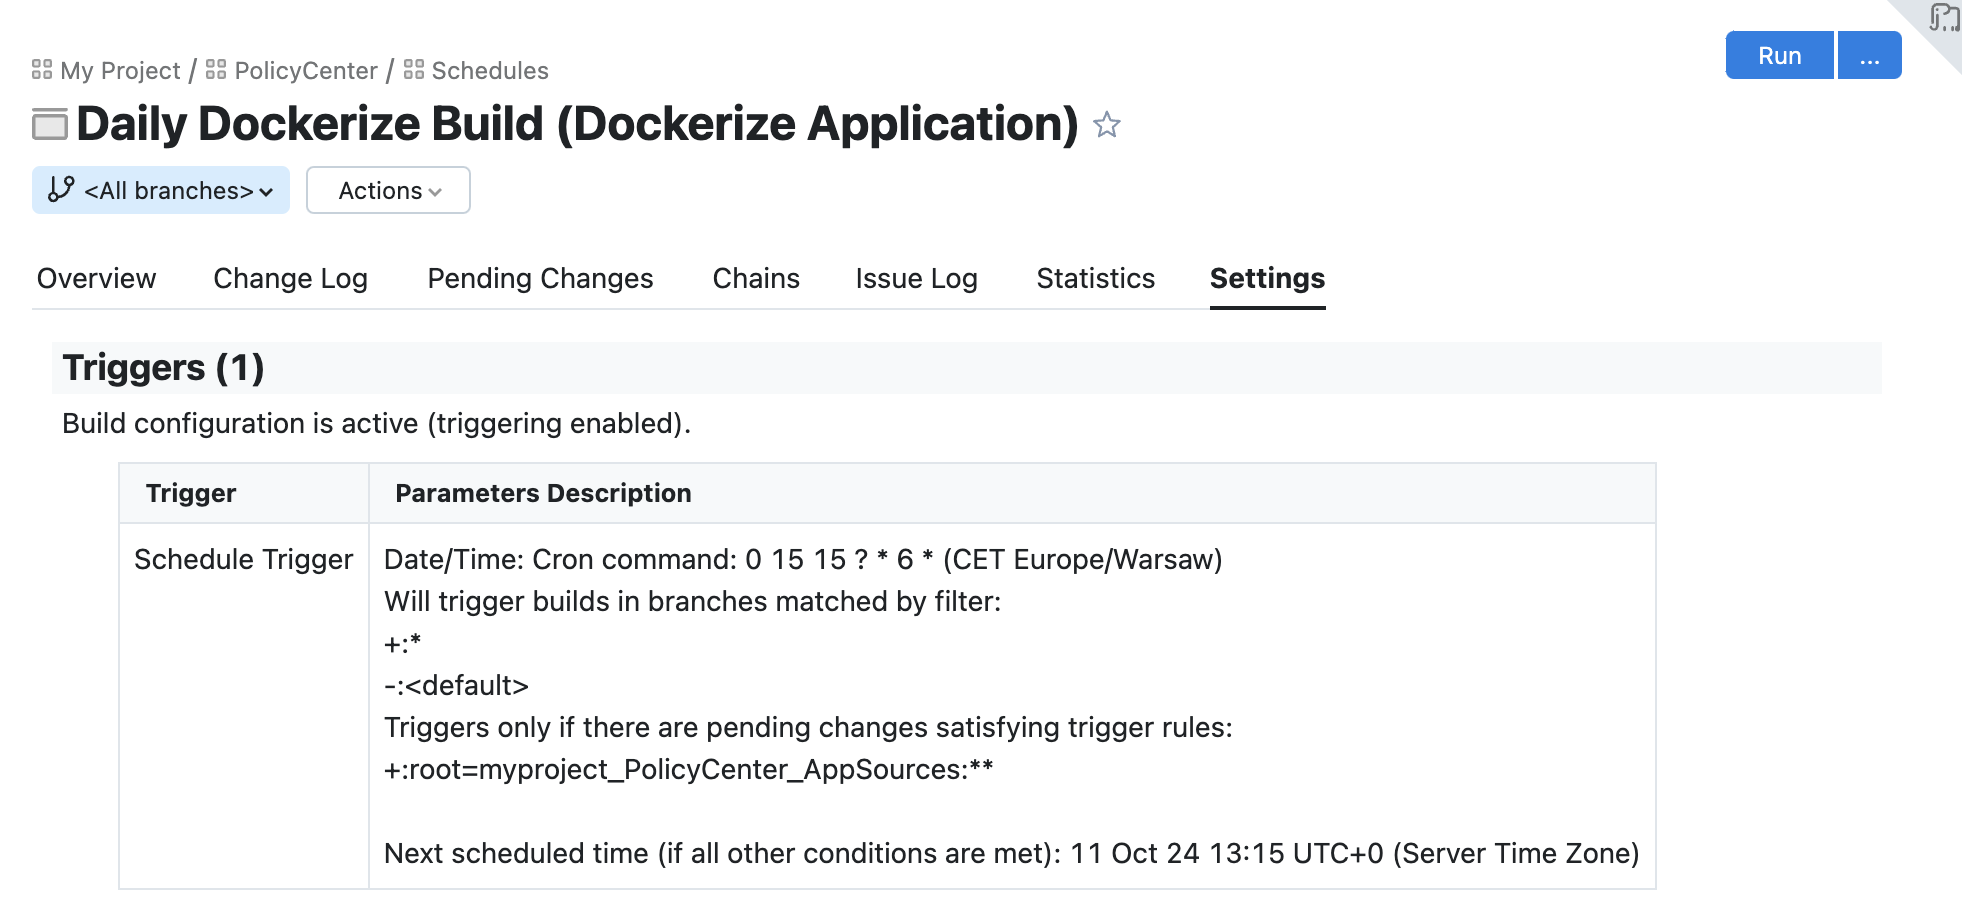
- Go to the Settings tab.
- In the table, check Parameters Description for the modified Schedule Trigger:

Deactivate a schedule
Instead of deleting a schedule, you can deactivate it. This way, you save the schedule configuration so you can activate it again when ready.
You can create up to 20 schedules. This number includes both active and inactive schedules across all your projects.
To deactivate a schedule, send the following PATCH request:
curl -X 'PATCH' \
  '{baseUrl}/api/v2/tenants/{tenantId}/starsystems/{starSystemId}/cicd-configs/{applicationId}/build-schedules/{buildScheduleId}' \
  -H 'Accept: */*' \
  -H 'Authorization: Bearer {access_token}' \
  -H 'Content-Type: application/json-patch+json' \
  -d '{body}'
Where {body} contains an updated schedule configuration. Follow the JSON Patch format:
[
  {
    "op": "replace",
    "path": "/enabled",
    "value": false
  }
]
For a successful request, you will receive the 200 status code.
Verify changes in TeamCity
Once you deactivate a schedule, you can verify changes in TeamCity:
- Select an application for which you created a schedule.
- In Schedules, find and select a composite build with your schedule name.
- Go to the Settings tab.
- In the Triggers section, you don't have any configured schedule triggers:
