Create a Jutro app
You can use our starter application to get started. This application gives you all the source code with examples.
Prerequisites
- Node version: >=22.6.0 < 23
- npm: >=10.8.2
Follow installation instructions depending on your operating system.
Get access to Artifactory
To get started with Jutro, set up your connection to the Jutro NPM repository in Artifactory.
If you do not have access to artifactory, you can request it in ServiceNow.
Repositories
jutro-suite-npm-dev repository is configured as proxy for a set of repositories where different JDP artifacts are stored but also for the public NPM registry. This allows developers to have a simplified set up by only configuring the access to this repository (instructions are listed below), and it is the recommended approach.
However, it is important to highlight that:
- The NPM install performance using this repository as proxy might be worse than using the proxied repositories directly
- In case of configuring the proxied repositories access individually, configure the NPM scopes also
The main repository for JDP artifacts is jutro-npm-dev-local and it contains the following scopes:
@jutro@digitalsdk@jutro-experimental
Set up your machine to use NPM packages from Artifactory
NPM packages required for Jutro apps are not available in the public NPM registry. Set your .npmrc to look for them in Guidewire Artifactory.
-
From your Okta homepage, log in to Artifactory.
-
Run the following command to set up access to the Jutro repository:
npm config set registry https://artifactory.guidewire.com/artifactory/api/npm/jutro-suite-npm-dev/
npm login --registry https://artifactory.guidewire.com/artifactory/api/npm/jutro-suite-npm-dev/
npm config set legacy-peer-deps true -
Follow the prompt in the terminal and press Enter to open a new browser window. You should now be successfully logged in.
https://artifactory.guidewire.com/artifactory/api/npm/jutro-npm-dev-local)Initiate a new Jutro app
We recommend using Node 22 when bootstrapping a new app. You can get the starter app from Artifactory using the npx command.
- In the directory where you want to create a sub-directory with the Jutro app, run the following command:
npx @jutro/create-app@<version> <app-name>
For "version", you can use one of the following:
latest- The latest, official, published version (eg, "2.0.5")next- The most recent, development build from the main branch (eg, "2.0.5-next.12345")- specific version, for example 3.4.0
<app-name> is referenced in the application code and also becomes the folder for your application. Follow prompts to configure your application.
For example, if you run the following command, you create a frontend folder that contains all your application files:
# Before you do anything,
# Make sure you're using the correct version of Node.js!
# See the prerequisites above

# You can enter a specific version of Jutro
npx @jutro/create-app@7.5.0 frontend

# Use "latest" to automatically get the highest published version of Jutro
npx @jutro/create-app@latest frontend
If you get an error like:
Invalid project name. Only alphanumeric and

- _ @ . / \

characters allowed!
make sure your folder name does not contain any spaces or other forbidden characters.
- ✅ right:
galaxy-frontend - ❌ wrong:
My new project (3)
During the installation, you may decide to include husky in your project. If you answer "yes" to one of the following questions:
- "Enable ESLint, Prettier, and stylelint commit hooks?" or
- "Enable commit message linting hook?" remember that husky won't work right away because Jutro app is installed without Git initialized.
To fix it, run
git init
npm install
You will already have a postinstall script inside your package.json that will always install husky after npm install command.
Run the starter application in interactive mode
npm start
Next steps
See the Quickstart for developers page for a brief overview of developing with Jutro, or follow the Learning Missions for a more guided tutorial on specific features of Jutro.
Troubleshooting
Error installing Playwright
Si está conectado a ZScaler e intenta ejecutar npm install, el comando intentará instalar el módulo playwright como una dependencia de @jutro/e2e-tests y fallará.
Se trata de un problema con el certificado y puede utilizar una de las siguientes soluciones temporales:
-
(Recomendado) descargue el certificado de CA personalizado proporcionado por los administradores de red de Guidewire y proporciónelo a NPM de una de las siguientes maneras:
-
Utilice la variable env:
Para MacOS:
echo "export NODE_EXTRA_CA_CERTS=<Path to Certificate>\ZscalerRootCertificate-2048-SHA256.crt" >> $HOME/.bashrcNote: Asegúrese de usar el archivo de configuración apropiado para su shell, por ejemplo, reemplace.bashrcpor.zshrcsi usa el shell zsh.Para Windows:
[System.Environment]::SetEnvironmentVariable("NODE_EXTRA_CA_CERTS", "C:\<Path to Certificate>\ZscalerRootCertificate-2048-SHA256.crt", "Machine")También puede aplicar la solución MacOS en un entorno de Windows aplicándola en el shell
Git Bash.Además, utilizar la variable de exportación permite el uso de todos los certificados de CA existentes. Este es al igual que los de ZScaler.
-
-
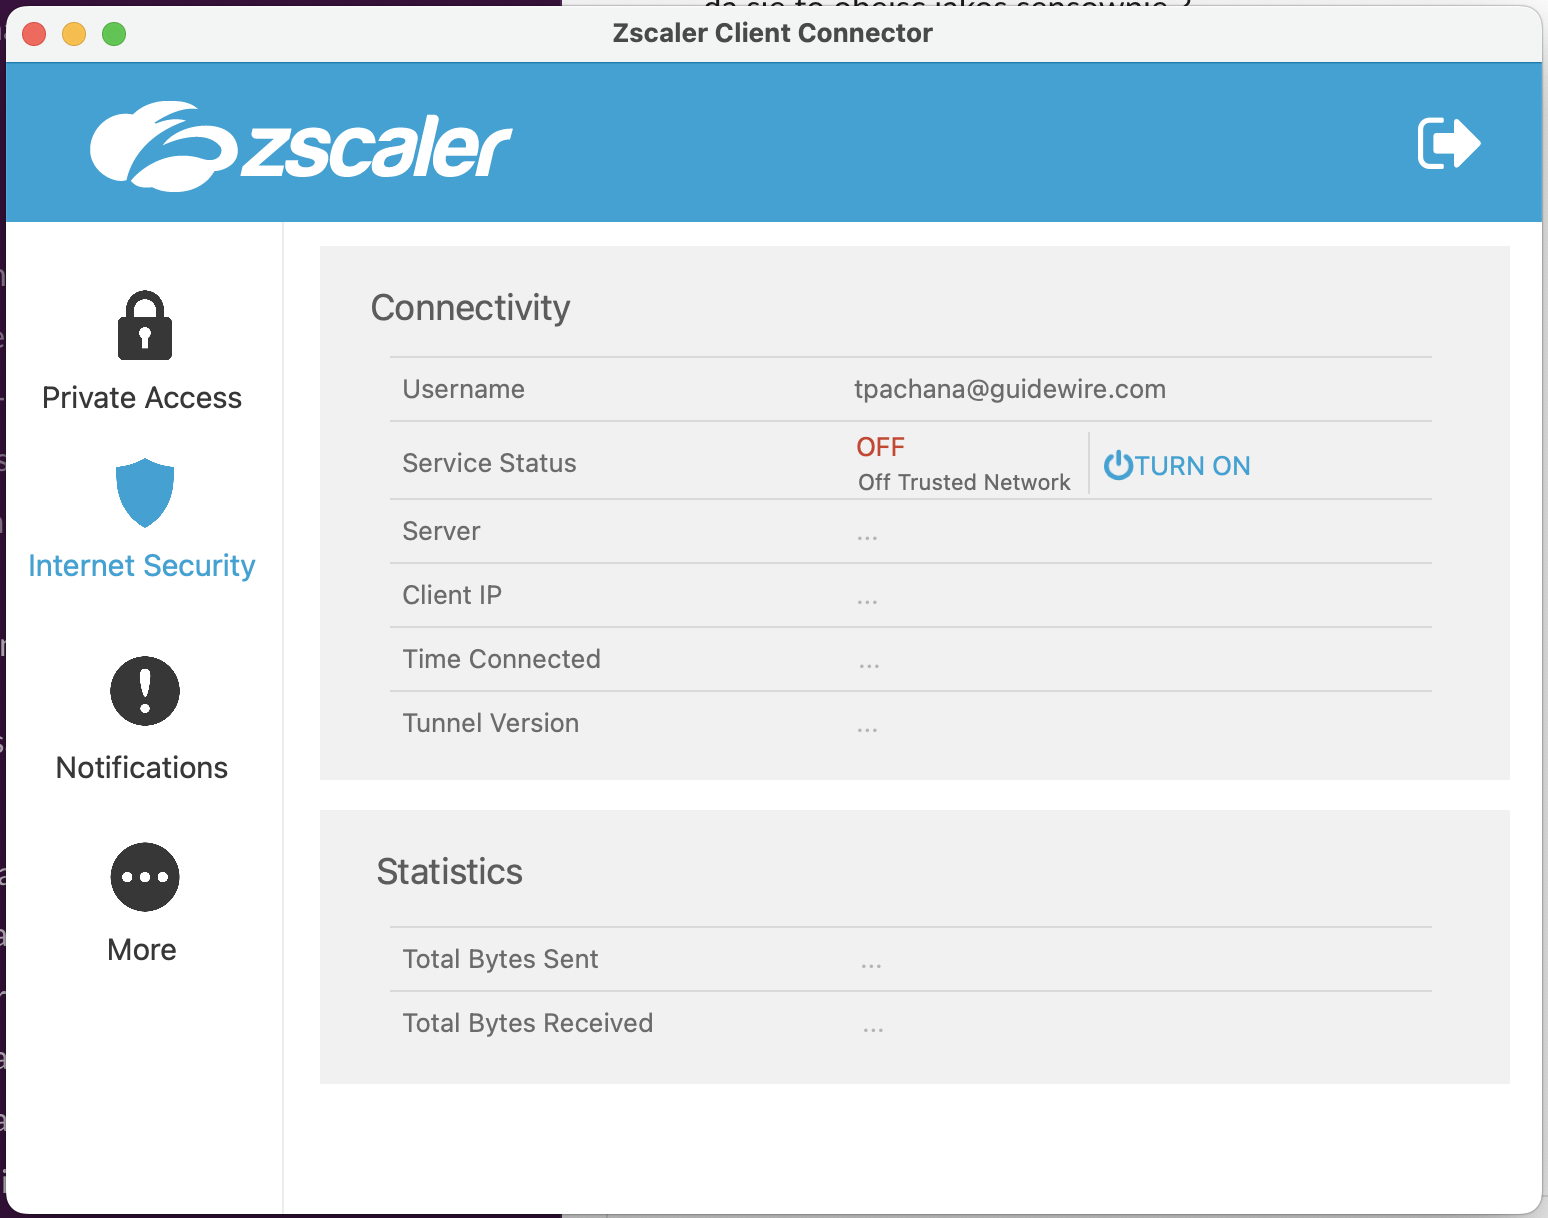
Deshabilite temporalmente la sección “Internet Security” (Seguridad de Internet) en Zscaler durante la instalación de las dependencias (instalación de NPM o de yarn) en el proyecto:
VPN error
When using VPN, you may get the following error:
npm ERR! Error: UNABLE_TO_VERIFY_LEAF_SIGNATURE
Solution: Run the following command:
npm config set strict-ssl false
Dev server returns index.html for any request
You may encounter an issue that looks like the following:

This occurs when the homepage property in your application's package.json file is set to the . character (period, also known as full stop).
Solution: Remove the homepage field, or set its value to an empty string.
Maximum call stack exceeded with module federation
You may encounter a "Maximum call stack size exceeded" error that looks like the following:
Uncaught (in promise) RangeError: Maximum call stack size exceeded
  at <anonymous>: 2:23963
  at Array. forEach (<anonymous>)
  at Object. t.f. consumes (anonymous>: 2:23753)
  at anonymous>: 2:2204
  at Array. reduce (<anonymous>)
  at Function.t.e (<anonymous>:2:2169)
  at Object. get (<anonymous>: 2:14179)
  at a (<anonymous>: 2:16873)
  at f (<anonymous>: 2:16707)
  at <anonymous>:2:17046
This is caused by webpack having issues compiling the history package as a shared dependency.
Solution: Remove the history package from the list of shared packages.
Incompatible ARM binaries
When running npm commands on a Mac computer with a M1 chip, you may encounter an error whose details say there is an 'incompatible architecture (have (x86_64), need (arm64e))'.
Execute the following steps to solve this issue:
- Install node version manager (nvm) if you do not already have it installed.
- Check your node version by running the
node -vcommand in your terminal. - Check your node architecture by running the
node -p process.archcommand in your terminal. This should printarm64. - If you are using
zsh, run thearch -x86_64 zshcommand in the same terminal. If you close the terminal then arch will revert toarm64. - Uninstall your current node version using the
nvm uninstallcommand, and then install version 22.6.0 by running thenvm install v22.6.0command. - Remove the
node_modulesdirectory from your project. - Run
npm install.
Cannot find module '../build/Release/canvas.node'
If your canvas module version is not at least 2.11.2, you may encounter the error Cannot find module '../build/Release/canvas.node'.
Solution: Add the following entries to the resolutions section in package.json:
"resemblejs": "5.0.0""canvas": "^2.11.2"
Run npm rebuild to complete this fix.